In winter, children and adults enjoy making a snowman, which is one of the symbols of this time of year. Therefore, when choosing a theme for themed crafts for children of different ages, the “Snowman” applique will be the most successful option.
On the one hand, there is nothing easier than making such a craft. But on the other hand, completely different materials can be used to implement it. In addition, the picture itself may include other characters and objects. For example, a New Year tree. And the snowman himself can be dressed in a variety of ways.
Snowman applique with templates for little ones
For young children who are just beginning to get acquainted with the concept of “applique,” you can make the simplest snowmen, for which templates are used that need to be traced, cut out of paper and glued to the base.

The 2nd junior group of kindergarten, as the experience of many teachers shows, with great desire makes winter applications with a snowman. Naturally, in addition to directly performing the craft itself, children get acquainted with various winter activities.
During the lesson, the child will become familiar with concepts such as shape and texture. Fine motor skills will develop. In this case, the material from which the craft will be made will be a napkin. Part of it needs to be crumpled to form dense lumps. In addition, you will need a sheet of blue cardboard, PVA glue and a brush.

The teacher's task is to draw three circles of different diameters on a sheet of cardboard. This will be the outline of the snowman. Next, you need to show your baby how to tear the napkin and roll it into a ball. To make the snowman beautiful and voluminous, you will need a sufficient number of such lumps.
Then you can start gluing them into the outline of the snow man. You must first apply glue with a brush to the bottom circle, which is the largest. Then we glue the napkin lumps, pressing them lightly onto the cardboard. If you apply too much force, the lump will lose the necessary round shape.
They need to be placed close to each other. There should be no distance between them. After this, you need to fill the middle and upper circle of the snowman in the same way. The teacher must monitor the progress of the work, making adjustments if necessary. Then you need to glue two buttons (two circles cut out of colored paper) onto the snowman’s jacket. We must not forget about the eyes and nose of the snowman.

In the process of doing crafts, the child develops accuracy, independence, and imagination. It is difficult for small children to sit in one place for a long time and do one thing, but if the process interests them very much, they will finish the appliqué to the end.
Before starting the task, it is advisable to talk with the children about the topic of winter and snowmen. Find out who has already sculpted them in the yard with their parents, and who is just planning to do so. Show different images of them, what they are like.
Snowman applique with cotton wool patterns
For older children, paper can be replaced with other materials, for example, cotton wool. You can also draw the outline of a snowman on a piece of cardboard and fill the space with pieces of torn cotton wool. Since the material is quite fluffy, the snowman will turn out very similar to a snowman.
To make the task a little more difficult, you can fill the bottom circle with large lumps. For the middle one, use slightly smaller lumps, and for the top one, use very tiny ones. In order to be able to roll into fairly dense balls, children need to dip their fingers in water. It is recommended to start gluing cotton balls from the middle of each circle. The contour needs to be lubricated with glue, then the lumps should be fixed close to each other.

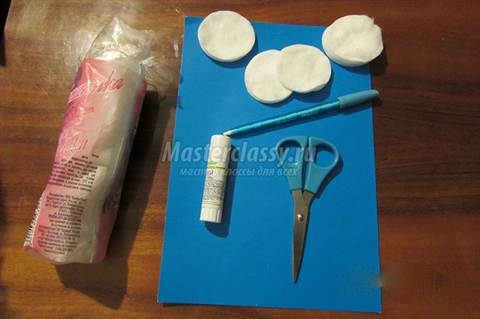
To make an applique from cotton pads, you will need scissors to make circles of the desired diameter. Then glue them vertically and draw the nose, eyes and mouth of the snowman. Snowman handles can be made from cotton swabs. They can also be used for legs, nose and broom.
Snowman made of cotton pads
For elementary school, you can make entire compositions using other objects, not just a snowman. You can make a New Year's toy for the Christmas tree. To do this, you need to take a sheet of cardboard and draw the outline of a snowman - three vertical circles of different diameters. Cut plastic tubes from cotton swabs. Use cotton parts to fill the outline of the snowman. You need to glue them starting from the edge, moving towards the center.
To make the figure look as voluminous as possible, each next rad needs to be glued to several sticks at an angle so that it covers the previous one. Sticks can be used to create a fence or house.
There should be three empty spaces in the middle of the middle and bottom circles. There will be buttons - pre-cut paper circles. We must not forget about the man’s face. The eyes and nose need to be cut out of paper and glued, and the mouth should be drawn. You also need to add a headdress to the snowman. Its role will be played by a bucket made of paper.
In addition to appliqués, you can make various three-dimensional figures that will decorate the festive table.
Video on the topic of the article
Before the onset of winter, when the first snow has fallen, the children are very impressed by what they see and it is simply necessary to maintain their spirit. This master class on making different versions of applications, in which the main winter character will, of course, be a snowman, can help with this. This is a simple topic for creating crafts, but you can use a variety of materials and actively use the child’s imagination to complete the task. Also, our “snowman” applique in the master class with templates can be supplemented with various interesting elements or figures, in addition to the snowman himself.
Learn to make beautiful “Snowman” applications with templates
This work will be made of paper. It is very simple and exciting for a child. Successful templates will be those that contain many different interesting details and elements. 
Thanks to this craft, the child will learn to stick shapes on paper, and will also contribute to the development of imagination and diligence.
- A template made by parents and printed on a color printer, or found on the Internet
- Scissors
- Cardboard on which the elements will be glued
- PVA glue
- Tassels
- Napkins
It is best to show your child various examples with applications before starting work, so that he has an idea of the future creation.
First you need to help your baby prepare the napkins. You need to tear them into small pieces and roll them into lumps, similar to real snowballs, from which snowmen are made that delight the children in the yard. In order for the snowman to have volume, you need to make as many of these lumps as possible. After all the lumps have been rolled up, you can create our snowman. You need to dip the brush into the glue and smear the largest bottom circle as carefully as possible, and then fill it with the lumps you made earlier. 
It is very important in this application that the lumps are located very tightly to each other. You need to fill in the rest of the circles with them.
The snowman is almost ready, but some details are missing. These are the eyes and nose, as well as the jacket and buttons. You need to cut out two more circles and glue them onto the second middle circle. Next, glue the cut out eyes and nose in the shape of a carrot.
Let's try to make a snowman with our own hands from cotton pads
The application can also be made from cotton pads. This is a little more complicated, but more interesting and exciting, and the result will be even more cute and will delight the child.
What materials will you need to create the craft:- Colored cardboard;
- Template with the figure of a drawn snowman;
- Several cotton pads;
- Brush;
- Cotton balls;
- PVA glue;
The same sheet of colored cardboard with the image of a snowman is used as in the first craft. Thanks to the use of cotton wool, the snowman will be snowy, and the cotton pieces covering it will look like real snow flakes. This can be done in different ways. Either fill the outline with rolled cotton balls, or simplify the work and fill it with pieces of cotton wool.
To make the work more interesting and unusual, you can fill the largest circle with larger pieces of cotton wool, the middle one with medium pieces, and the small one with the smallest pieces. If you want the cotton balls to be denser, then you need to wet the handles in water before rolling the balls.
You can start gluing the already made lumps onto colored cardboard, having previously smeared it with adhesive. We glue the first lump to the very center, and glue the rest in a circle so that they cover the bottom circle as tightly as possible.
You can make the “Snowman” applique in a master class with templates with older children even more interesting by complicating the task. 
In this work several different materials will be used. You can use cotton pads and cotton swabs to make arms and legs for a snowman, as well as a broom. You need to work with scissors to reduce the size of the cotton pads, then they will turn out to be different sizes.
Such a cotton snowman will be just like a real one, made of snow.
You need to glue the already made circles to the base.
Making a snowman from fabric in a selection of master classes
Fabric crafts are perfect for children aged 3-6 years. Such work will captivate the child, and the result will delight the parents and himself.
In order to make an applique with a snowman from fabric, you will need the following materials:
- Fleece or felt;
- Scissors;
- Adhesive intended for textiles;
- You can use a template
First, you need to lightly apply a template to the fabric, draw three circles and a bucket to make it easier for the child to glue future fabric parts, then cut out the elements of the snowman from the existing fleece or felt fabric. These will be three circles of different sizes, a carrot-shaped spout and a bucket. Next, you need to apply glue to the parts, and then stick them onto a fleece base.
To complement our snowman, you can use other fabrics to make the snowman's buttons, mouth and eyes. If you simplify the work, you can simply draw these elements with a pen or felt-tip pen. 
You can apply a design around the finished fabric snowman; to do this, use your child’s imagination and creativity.
This article will help wonderful housewives and needlewomen create high-quality and beautiful knitted items using Aran patterns, and at the end of the article there will be video tutorials for everyone.
Video materials on the topic of the article
One of the main winter heroes is the snowman. Children of all ages run outside with the first snow and make snowmen, good-natured snow men who are loved by everyone. That is why the snowman applique with templates is one of the most common applications that educators and teachers offer to make for their students. Moreover, templates for such an application are not difficult to find, and even easier to make yourself.
In our master class we will look at several craft options, including those made from paper and plasticine. Forward to exciting winter fun!
Snowman made of plasticine

This craft will be voluminous and very similar to a real snowman. For this we will need:
- plasticine (white for the body, different colors for other parts);
- stack for plasticine;
- small square of cardboard.

Very often this craft is made by children of the 2nd junior group, as it is quite easy. See for yourself:
- First we prepare the balls for the snowman. Let's roll three balls from white plasticine, one (bottom) is larger, the middle one is smaller, and the smallest is the top ball, the snowman's head. Let's put them on top of each other.
- Let's put a blouse on the snowman. Roll out the blue plasticine on the table not too thin, then wrap the middle ball and smooth it tightly with your hands.
- Let's make boots for a snowman from green plasticine.

- Now let's make a face for our snowman. Roll beady eyes from black plasticine, and a carrot nose from orange plasticine. We carefully stick all this onto the top, smallest ball.

- We will also attach the arms and sleeves of the blouse.
- Let's make a scarf from a strip of green plasticine. Roll out a small strip so that it is not too thin, wrap it around the “neck” - the junction of the middle and upper balls. Let's apply the drawing in a stack.

- And the final step is a bucket on the head. Let's mold it from gray plasticine. Our snowman is ready! Let's put it on a cardboard stand.
From cotton pads

What else reminds us of snow and snowmen? That's right, cotton pads. Since they have recently proven themselves to be an excellent material for appliques, let's make a snowman out of cotton pads.
We will need:
- cotton pads;
- paints and brushes;
- glue;
- scissors;
- cardboard for background.
Typically, to create a snowman you need two or three cotton pads for the body and one for creating various parts.

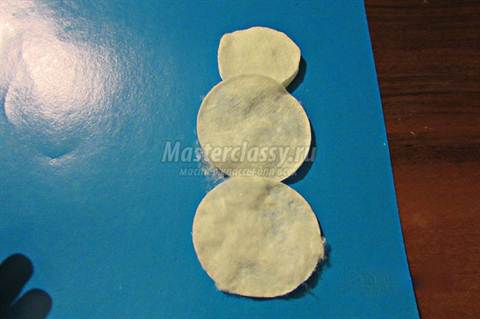
First, let's give the cotton pads the desired size. To do this, we will leave two disks the same size, and cut the third one, which will be the head, a little. You can skip this step if you wish.
Now we take blue or silver cardboard and start gluing the snowman. We start with the top ball, then the middle and bottom.


Let's move on to making the snowman's arms and legs. To do this, cut out two small circles and two circles with a slightly larger diameter from a cotton pad. Let's glue them to the snowman.


Then we cut out the cylinder hat and also glue it to the snowman.

Let's cut out a broom from colored paper and glue it as if a snowman is holding it in his hand.

Now we take paints and draw the snowman’s eyes, carrot nose and mouth.


If desired, you can complement the picture with a Christmas tree made of cotton pads or snowdrifts.

Paper craft

Cutting and gluing paper parts onto cardboard is easy and simple; you can use the method from the master class with cotton pads.
Let's make a snowman in the form of a Christmas tree decoration using paper, pencil, compass, glue, string and markers.
The work progress will be as follows:
- On paper, using a compass, we will draw two circles, one of which will be the head, and therefore will be smaller in diameter than the other. We draw them so that we get not two separate circles, but one continuous silhouette of a snowman, that is, the circles need to be drawn slightly overlapping each other. Let's cut out two identical silhouettes.
- In order for the snowman’s body to be voluminous, we need to draw 16 more circles of the same diameter as the bottom circle. You can fold a sheet of paper three times, draw a circle and cut it out, so you get more circles at once.
- Let's take a rope, fold it in half, as shown in the picture, and glue it to one silhouette. We cover the lower part with the rope with the second silhouette and glue it.

- Now let's move on to the volumetric bottom of the snowman. To do this, fold the cut out circles in half and glue the sides to each other (see photo). It should look like two parts.

- Glue the resulting volumetric parts from the front and back to the bottom circle of the snowman.
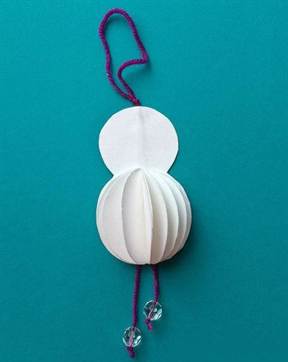
- We complement the image with a hat cut out of colored paper, draw eyes, nose, mouth. We tie the remaining rope as a scarf.
The paper Christmas tree toy is ready!
Sock product
You can also make a snowman craft using a white sock, buttons and rice or any cereal as a filler. This snowman will become a decoration for your New Year's decor.

Cut off the high part of the sock, which is on the shin.

We tie one end of it with an elastic band and turn it inside out.
The New Year is just around the corner. Absolutely everyone, especially children, is looking forward to this holiday! We associate New Year with snow and all the accompanying winter fun: sleds, skis, ice skates and, of course, the snow woman. As soon as the first snow falls, children run into the courtyards to build a snowman.
What to do if there is no snow, but your soul requires a snowy friend? Nothing is impossible in the world, especially on the eve of the New Year! You can make a real snowman not only from snow, and in this article we will tell you in detail and even show you how!
Paper snowmen
You can make snowmen with your own hands from any materials, even the most unexpected ones, but we will start with something simple - with paper. Well, firstly, everyone has paper in the house, even those who are completely far from needlework. In any case, there will definitely be a couple of sheets of white paper. And for the snowman we just need white paper. And secondly, paper crafts are quite simple and easy to make.
#1 Draw a snowman
Here's a great craft idea for kindergarten - a snowman in a snow globe. You need to cut out two simple blanks from colored paper; by the way, kids can easily do it on their own; the elements are large and do not require special care. And then draw a snowman and snowfall in the ball with your fingers. The snowman craft for kindergarten is ready!
Here's another craft idea for little ones. In this case, snowmen are drawn using plastic bottle caps. You need two plugs of different sizes (larger and smaller). Spread it with white paint and make an imprint. Draw in the face, handles and buttons with felt-tip pens when the paint is completely dry. A hat and scarf can be made from colored tape, colored paper or felt, for example.

#2 Applications
Easy-to-make snowman crafts using the applique technique. You will need white paper, glue and a little imagination. The simplest option is three circles glued onto a sheet of colored or painted paper for contrast. You can further decorate the craft with glitter, sequins, stickers, etc.

Here is another version of a simple craft using the applique technique. The snowman does not look straight, but upward, which adds magic and reality to the craft.

But here is a slightly more complex option with small decorative elements. You can download the template of the snowman and decorative elements below the picture.

And here is a snowman craft that can be hung on a Christmas tree as a toy or used as a gift tag, indicating who the gift is for and from whom.

And here is a version of a snowman for kindergarten. The kid will be able to cope with such a task quite well, and most importantly, he will not have time to lose interest, because he will be able to do almost everything himself.

Here is a great option for an advent calendar. You can make such a craft with your child, and it will be very convenient for him to count the days until the most important holiday or until the holidays. You can download the template under the photo.

And some more ideas:


See more:

Time runs inexorably forward and now white flies are flying outside the window, slowly falling to the ground and covering everything around with a snow-white fluffy blanket. However, despite the cold, my soul is warm and joyful. And all because suddenly appearing snowflakes herald the coming of the New Year. The most important holiday of the year is already very close, which means it’s time to think […]
#3 Origami
You can make a snowman out of paper using the origami technique. There is nothing complicated, you just need to strictly follow the instructions, which are detailed in the picture below.
#4 Volumetric snowmen
You can also make three-dimensional snowmen from paper. Here, for example, is a three-dimensional geometric snowman, which you can easily make using ready-made templates, which you can download below the picture. How to fold the workpiece is described in detail in the MK in the picture.

And here is the same snowman, only melted. You can also download the diagram under the master class.

And here is a snowman with a voluminous belly. Draw a blank of the snowman's body and additionally cut out several circles the size of the bottom of the snowman. Bend the circles in half and glue them together, and then glue them to the workpiece. Do-it-yourself voluminous snowman and Christmas tree are ready!

And some more ideas:


# Vytynanki
If you have never heard of vytynankas, then it’s time to get acquainted with this type of needlework. What are these same vytynanki - these are carved patterns made of paper. Moreover, you can cut out not only abstract patterns, but also entire concrete compositions. Vytynki often decorate the windows of schools, kindergartens, shops and office buildings. Winter compositions look especially beautiful. This is probably why it is customary for us to decorate windows with cutouts during the New Year holidays. You can find ready-made snowman templates below.


You'll like it:

New Year is one of the brightest holidays of the year. It is simply impossible not to love him. The date December 31st evokes only positive emotions. How could it be otherwise, because the New Year is associated with lights, bright colors and the beauty of transformed streets. On the eve of the holiday, everything around changes beyond recognition and there is not a single person who can remain […]
Felt snowmen
Felt is rightfully considered an excellent material for needlework. You can create incredible crafts from this seemingly unremarkable material. In this article you will find more than 30 templates and patterns for snowman crafts that you can make with your own hands.


Patterns and templates:
See more:

The New Year holidays are approaching, which means that very soon a forest guest will appear in almost every home in our country. Some people prefer to put up an artificial Christmas tree, some prefer to put up a real forest spruce from a Christmas market, and some even confine themselves to pine branches. However, this is not so important, because the most important feature of the New Year tree is the toys. Since ancient times, people in [...]
Embroidery
If you are a jack of all trades and excellent with a thread and a needle, then you definitely need to do embroidery with a snowman this New Year. Here you will find more than 40 cute patterns.

Scheme:
Snowmen treats
You can also decorate the New Year's table with snowmen. Themed treats are especially relevant for children's parties. So if you are planning a big children's party, be sure to pay attention to snowmen in the form of treats.
An unusual delicacy awaits guests, made from salted rings and white chocolate. You will need: chewing toffee, a ring, chocolate (white and dark). Place the toffee on parchment and drop a little melted chocolate in the center. Then place the rings in this place and secure with chocolate again. Fill the rings themselves with chocolate and decorate with chocolate chips (eyes, nose, mouth, buttons). Wait until the chocolate hardens and wrap the scarf in toffee. The treats will come off the parchment very easily. All that remains is to place the snowmen on a plate!

And here are snowmen on a stick. To prepare you will need sandwich cookies, white chocolate, chocolate chips and red round candies. Place the cookies on a stick and dip them in chocolate. Immediately decorate with chocolate chips and red candy and send to dry. You can put it on parchment to dry, the chocolate will not stick or rub off.

And to prepare such a treat you will need: chocolate (white and dark), bread sticks, marmalade for the nose. First, dip each stick in white chocolate and place it tightly together on parchment paper. Wait until completely dry. Afterwards, dip this design in dark chocolate (for the hat), draw eyes, a mouth and put marmalade on the nose. Wait for it to dry and you can try!

This delicious gift can be decorated as a snowman. You will need powdered sugar donuts, a plastic bag, red ribbon, black paper, and a marker. You can buy donuts at the store or make your own. Well, then everything is simple: place it in a bag, tie it with a ribbon (like a scarf), stick on a headdress and draw a face. A great gift for a work colleague!

But a special treat is melted snowmen. Take a cookie, place chewing marshmallows (marshmallows) on it, cover with foil and place in the oven for a few minutes. The marshmallow will melt a little. Now put a second marshmallow on top, draw a face and decorate with marmalade or candies. Use toothpicks as handles.

More desserts for the New Year:

When the long-awaited New Year's Eve approaches, all housewives take out their proven family recipes from old, battered notebooks. Of course, no one under any circumstances will give away their delicious secrets. Just imagine what fragrant masterpieces come out of the oven! Now they are already standing on the table, decorated, glowing with heat, flaunting festive sprinkles, chocolate chips, orange zest and sprinkled with sugar […]
Snowmen Christmas balls
You can make a snowman with your own hands from Christmas balls. For such a craft, you will need either a special blank or an old Christmas tree ball. Below are several master classes on making snowmen from Christmas tree balls with your own hands.
To make such a snowman you will need a ball blank, an old sock, acrylic paint (or gouache), and a marker. Cut the sock and put it on the ball. Pour a little paint inside the ball and twist the workpiece so that the paint evenly covers the inside of the ball walls. Tie the sock at the top and draw eyes, nose and mouth for the snowman. The Christmas tree toy snowman is ready!

Here is another simple option for making a Christmas tree toy in the shape of a snowman with your own hands. To make it you will need a ball blank, foam balls or white beads, and a marker. Fill the blank with foam or white beads to the top, close the ball and draw a face. The New Year's snowman ball is ready!

Here is another variation on the theme of foam balls or beads. The only difference between this MK and the previous one is the decor of the ball itself, i.e. snowman. In this craft, the Snowman is additionally decorated with warm headphones. As an option, you can put on him a hat, a cap, or a more traditional option for us - a bucket.

But here is approximately the same snowman made from a Christmas ball, only artificial snow is poured inside the blank.

Here is a great craft option for kids. Kids don’t yet know how to draw properly, but they can definitely decorate a Christmas ball with snowmen made from fingerprints. For detailed MK, see the photo below.

This option is suitable for those who do not have a blank, but have a regular, undecorated Christmas ball.

And some more ideas for inspiration:


More New Year's balls: no comments yet
Snowmen made from scrap materials
It often happens that you want to get creative, but there is nothing at hand. Some people get upset and leave this idea until better times, while others look for other opportunities. And that’s right; you can make crafts with your own hands from a variety of different and sometimes unexpected materials, which are sure to be found in every home. Now we will talk about such crafts.
#1 Snowmen made from cotton pads
It is difficult to find a woman or girl who does not have cotton pads. And they make wonderful New Year’s crafts, especially when it comes to snowmen. The cotton pad initially has the correct round shape, so there is no need to cut anything out.

To create the volume of the craft, you can put a little ordinary cotton wool between the disks. Then the craft will resemble a miniature soft toy.

With kids, you can make appliqués from cotton pads, frame them like a picture, or make, for example, a postcard for grandma or dad.

If you can’t find cotton pads, cotton balls are also suitable for crafts. As a last resort, just tear small pieces of ordinary cotton wool and glue. It will be even more interesting.

Well, how exactly to glue the cotton wool is up to you to decide. Use your imagination, and the ice cream snowman is the limit!

#2 Paper plate snowmen
Cool crafts can be made from ordinary paper plates. You will find a step-by-step master class on making a snowman-skier below. Both toddlers and older children will enjoy this craft.

And here is a simpler option: a triangle snowman. Ideal for kindergarten.

Or, for example, another simple snowman with your own hands, which can be made with children of kindergarten age. Simple, fast, cute!

And of course a shiny snowman. We have all seen how the snow shimmers in the sun. To make our snowman shimmer like this, we will cover it with coarse salt. A couple of buttons for the eyes, a couple for the blush - and the snowman is ready!

#3 Snowmen made from paper cups
From available materials, paper cups are also suitable for making a snowman. Additionally, for decoration you will need several strips of felt, a pom-pom and fluffy wire. See step-by-step photo instructions below.

#4 Snowmen made from plastic cups
You can also make a snowman with your own hands from plastic cups. The statue turns out to be huge and is better suited for street decor. So if there is no snow, gather the kids from the yard and make the whole yard a snowman without snow! Snow and snow, but there should be a festive mood no matter what!

#5 Snowman made from plastic bottles
By the way, great snowmen are made from ordinary plastic bottles. So if you collect your garbage separately, the time has finally come for plastic bottles. Go decor! By the way, snowmen made from plastic bottles can be used as pins for playing New Year's bowling! Sign the number of points on each snowman and the whole family will truly enjoy the New Year holidays!


The New Year holidays are approaching, there is less and less time left, and there are more and more worries and hassles in preparing for the holiday! It is especially difficult for mothers during these pre-holiday days. Little fidgets are looking forward to the holiday, so mothers have to come up with interesting games and activities every day. If your imagination no longer works, our cool master classes on making New Year’s crafts from […]
#7 Salt dough snowmen
If you haven’t found anything suitable for crafts, then it’s time to start making salt dough crafts. Real sculptors definitely have a place to roam here. Well, kids can make crafts using fingerprints.


You can get a little creative and build a melted snowman.

On the eve of the New Year holidays, not only adults are concerned about preparing gifts. Children also want to present surprises in the form of postcards to their relatives and friends. But they don’t always have enough imagination to create something original. In this article we will talk about how to make a snowman applique from paper.
Postcard with a three-dimensional element
Even a child can make such a craft. It will be based on a paper “Snowman” applique.
First you need to draw or print a beautiful background. This could be any New Year's story. For example, snow-covered trees, a house or snowfall. When the background is ready, we proceed to the application. You need to cut out a snowman. You can take its silhouette from our sample or come up with it yourself. Cut out a figure from paper and glue it to the background. The matter remains small. You need to cut out two identical snowflakes. We glue one of them completely onto the postcard, and bend the second in the middle and glue it to the center of the first. This way you can create a voluminous snowflake. As additional elements, you can use multi-colored stars cut out of colored foil.
Snowman template
This applique can be used to decorate glass or New Year cards. You will need to cut out the template.

The paper snowman applique should be cut out with nail scissors. This way you can make even the smallest holes. Print out the sample above. You can use any other template. Cut out the snowman. You can attach it to the window using a soap solution. The funny figurine can also be used to decorate cards or any other crafts.
Snowman using quilling technique
Making such a card is very simple. The most difficult task here will be cutting even strips of paper. To make it easier for you to make a postcard, you can buy a ready-made quilling kit at any craft store.

The "Snowman" paper applique is made as follows. Take the strip and twist it with scissors on both sides. Glue the first piece onto the bottom of the card. We attach the second blank just below the first. Thus, we make snowdrifts on which the snowman will stand. Now you need to twist three more strips. The first blank should be the largest. This will be the bottom ball. We trim the second strip a little so that it is slightly smaller than the first. Glue the second ball onto the first. All that remains is to make the head. This blank should be the smallest. We attach it to the postcard.
Now we need to detail the snowman. Twist two black or brown stripes. The first one is given the shape of a rectangle. To do this, you need to crease the paper a little. We give the second blank a square shape. We assemble a hat from strips. We make a broom from a thick thread. Cut a small piece and tie it into a knot. We fluff one edge and glue it next to the second snowball. You can add glitter or gouache to the card.
Textured paper card
To make this craft, you need to find a beautiful cardboard that will have a relief. It will become the basis of the postcard.

How to make a snowman applique out of paper? Cut out a circle from a white sheet of paper. Using light strokes of a brush dipped in pink watercolor, draw the cheeks. We outline the circle with blue paint. From black paper we cut out two circles and an arc. Assembling the mouth. Cut out a carrot from orange paper and attach it to the place of the nose. We will make the eyes from black beads. Instead, you can use buttons. Cut out a scarf from burgundy textured paper. It should be shaped like a rectangle with rounded edges.
We will make the hat and holly (a traditional American New Year's plant) from felt. Cut out a square and a thin rectangle with rounded edges from black fabric. We assemble a hat from the blanks and place it on the snowman’s head. Now we need to make the holly. We cut out leaves from green felt, and berries from red felt. We glue the decor to the scarf, and our card is ready.
Snowman made from scraps
Even a 3-4 year old child can make such a card. The paper snowman applique will be made as follows. Cut the album sheet into small pieces. Using glue, we form three circles on a colored background. The bottom one should be large and the top one small. Now we take the scraps and generously sprinkle them on the glue spots.

You need to complement the voluminous paper snowman applique with a hat and hands. Cut out three thin strips from black paper. Glue two of them to the middle ball, and cut the third into 6 pieces. We add three fingers to each hand. We make the hat according to the following scheme. Cut out a square and a thin rectangle from black paper. First we glue a large part onto the snowman’s head, then a small one. There is very little left. We cut out three circles from black paper and glue them to the second snowball. These will be buttons. Cut out a mouth from red paper, and a triangle-carrot from orange paper. It is better to use purchased eyes, but if there are none, then we make them from scrap materials. Glue all the parts onto the top snowball.
Corrugated snowman
This craft can be used as a decoration for a postcard or a New Year's gift. How to make a snowman applique from colored paper? We will glue the main parts from accordions. We take a sheet and fold it according to the following pattern: fold 1 cm in length, turn the paper over and fold another 1 cm, turn it over again and fold it again. This way you can make an accordion. We bend the workpiece in half and glue the tails. It should be a circle.

In the same way we make all the balls that make up the snowman. We make another accordion from green paper. We cut its ends with scissors on both sides. Fold the piece in half and glue it between the head and body. All that remains is to decorate the snowman. Sew buttons to the center of the large and medium ball. We make eyes, a mouth and a carrot from paper. From colored paper we cut out a hat to which you can glue a bow or holly.
Snowman on a sled

This card is very easy to make. You need to print the template above. Carefully cut it out and glue it to the paper base. This snowman can be used to decorate not only postcards, but also walls, glass and other flat surfaces.


